
HSF #0: Starting Simple
January 2nd, 2013
New year, new petticoat. Yep, I’m still me.
Amid the holiday rush, I managed to find a few hours each day to “zen out” on handsewing. The result, a long overdue petticoat for a swath of 1850s-era “guipure” crochet edging I finished more than a year ago. Why now, you ask? What exactly motivated me to finally get this done?
It was the Historical Sew Fortnightly, organized by The Dreamstress, who is one of my very favorite bloggers even though I’ve never met her (I always feel a bit uneasy reading the blogs of people I don’t actually know — sort of like I am stalking them).
Anyways, the idea is that participants are challenged to sew an historical (pre-1938) garment every two weeks for the next year — 26 in all. Each fortnight has a theme around which to organize your project. And best of all, there’s a bustling Facebook group to share research, inspiration, and lots of delicious pictures of the completed projects! This petticoat is my contribution for challenge #0, the pre-challenge. It’s title was “Starting Simple.” Make something fairly easy, and/or something that you’ve made before.
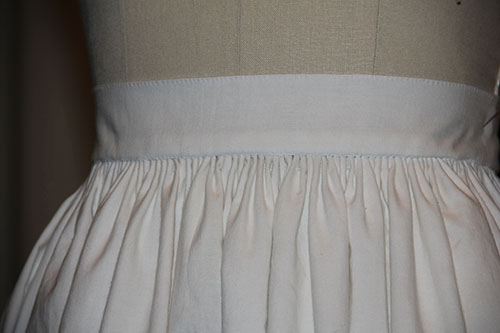
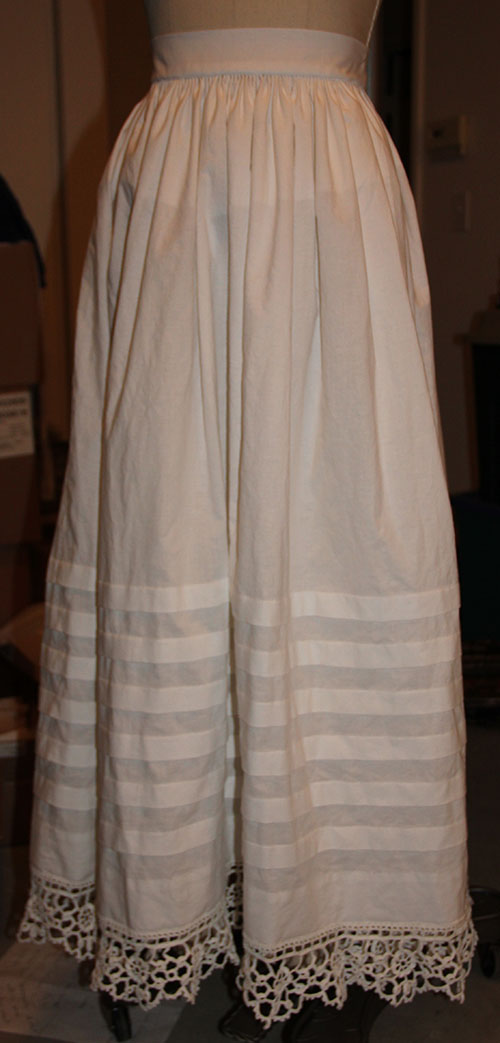
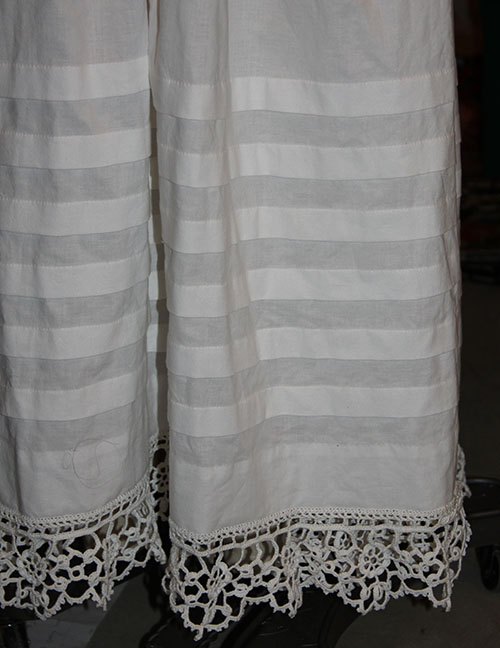
It’s a basic mid-19th century style top-layer petticoat. I used three breadths of 45 inch cotton, sewn up the selvedges and cartridge pleated to a buttoned waistband. Based on this gorgeous example from The Metropolitan Museum, I decided to include 6 tucks above the edging.

As is obvious from the picture of my deflated petticoat at the top of this post, I still need to put my cage crinoline together. I blush to admit I was in such a hurry to finish this, I committed the curatorial sin of using an extant cage crinoline (circa 1860-1865) from my personal collection to balance the petticoat. But I did resist the urge to get it out again for the photograph. I was also too lazy to put on my corset to figure out where to sew the buttons…
Just the facts, Ma’am:
The Challenge: #0 Starting Simple
Fabric: Cotton muslin
Pattern: Based on period directions and extant garments
Year: 1850-56
Notions: 2 mother-of-pearl buttons (I need to learn to make thread buttons!)
How historically accurate is it?About 90%. It’s impossible to get completely accurate materials — for example, the quality and size of the cotton are a little off, and I have a feeling the thread I used for the crocheted edging is the wrong size (it was the right number, but seems a little on the large side). Otherwise, it’s completely hand-sewn with period plain-sewing stitches.
Hours to complete: 20-30. Thanks to those six tucks, I figure I put upwards of 1,200 inches of sewing into this petticoat. Much of it running at 18-stitches-to-the-inch…
First worn: Not for a while yet — I need to finish the cage and/or crinoline, not to mention a whole bunch of other pieces to complete my 1850s wardrobe. This petticoat, along with others, will eventually be part of a mixed-media art exhibit as well.
Total cost: Counting fabric and crochet thread, about $15.
Second Armistice Blouse
December 9th, 2012
Armistice blouse number two has much more in common with its early 20th-century inspiration style than my first attempt.

It’s completely hand finished — I used the machine only for the side seams (they are finished by hand with a faux French seam), attaching the collar, pintucking the front panel, and sewing the waist cord. The fabric is a nearly-sheer, thread-dyed cotton gauze pinstripe that I picked up on the clearance rack at Walmart, of all places.
In terms of basic shape, this blouse doesn’t differ much from my first try. It’s still got the kimono sleeves, though much shorter. I also shortened the length so it’s more of a shirt, less of a tunic. And I added the traditional collar. (Though my collar pattern, which began as square cut, a la middy, misfired by the time I decided to make it narrow and rounded. It doesn’t lay flat in the back, causing all sorts of unpleasant rippling.)

I also reverted to the utilitarian waist tie — on period examples I’ve seen, this tie is usually made from narrow twill tape, never meant to be seen. It contained the blouse’s fullness so it could be neatly tucked into a fitted skirt. Since I don’t intend to wear this blouse (at least not exclusively) with late-Edwardian skirts, I compromised with a self-fabric tie, top-stitched over a double pleat at center back, and held in place with thread loops at the side seams.

Hand finishing aside, what really took time on this version were the embellishments. They’re pretty restrained compared to some period examples, but I like the understated delicacy. The collar and sleeves are trimmed in tatted lace, made especially for the blouse by yours truly. The sleeves and center panel edges were handkerchief hemmed (a very basic drawn thread stitch). Then, in the case of the center panel, I used matching pink cotton floss to faggot the edges together. You see a lot of this in original garments, though not usually around the center panel, since that was left open on one or both sides. A front closure with scores of teeny tiny buttons meant you didn’t need to pull the blouse over your head, which is much harder to do when you’re wearing a corset…
For modern ease of wearing, not to mention my legendary hatred of buttonholes, I decided to make this an over-the-head style. Version three is already underway. I’m going to adjust the fit a little under the arms, and add pintucking over the shoulders as well, in an attempt to contain some of the bagginess around the bust. And I need to figure out the whole collar thing too. I’m also thinking about doing a little tatted motif to set into the front panel. We’ll see how ambitious I get.
Birthday Bonnets
December 8th, 2012
In celebration of a recent natal anniversary, my affectionate mother sent a package of goodies across the country. The contents proved how well she (and my father, who enclosed a beautiful William Morris-themed notebook) knows me. To witness, this pair of sunbonnets:

I guess she was tired of hearing me worry about ruining my porcelain complexion in the California sun. Alas, it’s probably too late. Since moving here nearly a year ago, my face and arms have taken on a decidedly berry-like glow. And my hair has changed from mousy brown to some weird mix of gold, brown, and red, with a few pale blond streaks on top.

Not many people wear sunbonnets these days. I only knew of one person in NYC who indulged (needless to say, she is a close friend). Alas, I can’t seem to find the post featuring her amazing bonnet — it was black and white striped silk with slats a mile long. Swoon. But I haven’t seen a single soul wearing a sunbonnet out here on the central coast of California. Yet.
My mother tells me she bought my bonnets at a store in south eastern Pennsylvania that caters to Amish and Mennonite communities. Groups that subscribe to traditional or modest dress for religious or social reasons, along with historical reenactors, seem to be the last major proponents of the sunbonnet. A mere century ago, this was definitely not the case. Sunbonnets were necessary work clothing for many American women. Lest I overstep my rather limited knowledge in this area, let me instead recommend The Sunbonnet: An American Icon in Texas, by Rebecca Jumper Matheson. Small world — I had the honor to help organize a book launch party for this title when I worked at an historic house in New York City.
And last but not least, a picture of my new sunbonnet doing what sunbonnets do best: covering my face!

(H)at Long Last
December 7th, 2012
*Lest I forget to mention it — you can purchase the hats here*
The pixie hats are done. Finished. Completed. Along with 54 assorted pin-on ribbon & felt flowers. Leaving me only sort of cross-eyed.
Once again, I am left wondering about the D. H. Lawrence connection, but I swear it made sense at the time.

I had a little too much fun adjusting colors on the outdoor shots in Adobe Lightroom …

And of course, the all important interior shot, complete with a view of my brand new embroidered labels.

I think it’s fair to say I would never make it in a sweat shop. I tried to find shortcuts to speed up the production of the hats, but in the end sewed the exteriors completely by hand — including the ribbon binding. I like to think it’s because of my exacting standards, but in truth, I’m sort of lousy at machine sewing. Things just turn out better when I do them by hand. Plus I’ve gotten addicted to the control of hand stitching; I can’t understand why my machine balks at 1/4 inch seam allowances.
First Armistice Blouse
December 6th, 2012
To be honest, I don’t really know when or why this early 20th-century blouse style came to be called “Armistice.” It’s probably due to their great popularity during World War I. Whatever you call them, I think these delicate blouses are the perfect blend of Edwardian elegance and art nouveau flair.

I don’t have a picture of a period Armistice blouse handy, but you can easily find one on Google if you aren’t already familiar with the form (recently re-popularized by Downton Abbey). There’s also a classic Folkwear pattern for the Armistice blouse style. It’s reviewed here, on one of my favorite blogs.
My first attempt is rather deconstructed. I kept the basic bodice front, with an inset panel forming the trademark square neckline. I also included a waist tie, though mine goes backwards instead of forwards (originally, the tie was meant to contain the blouse when it was tucked into a skirt). I left off the collar though, and cut it with kimono sleeves. And, since it’s so loosely fitted, I didn’t bother with a front side opening.
It’s incredibly comfortable to wear, and was pretty darn easy to put together. I didn’t even make a pattern. Just measured and cut. But now that I see it in a picture, I have to admit it does project a certain frumpiness…the next version is already underway, and should be much more delicately styled.
Oh, and once I get it right, I intend to make enough to share! They’ll be in my newly opened Etsy shop. Yes, I too have succumbed.
« Newer Posts — Older Posts »