
More Old Lace
April 18th, 2013
I mentioned a few days ago that I’d been knitting lace patterns from the 1880’s onto the bottom of a modern pencil skirt design. Here’s another.

This pattern is also from Weldon’s Practical Knitter — it’s the border for a “Corinthian Shawl” knitted in reverse. I really like the three-dimensional scale effect of the pattern’s alternating repeats. It’s hard to see in the picture, thanks to poor lighting and dark yarn.
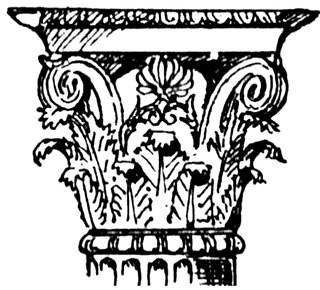
Actually, that overlapping scale pattern is probably the reason it’s called Corinthian. Here’s an illustration of a Greek column, Corinthian order. It’s originally from The Universal Self Instructor, 1883. I’m borrowing it from Clip Art Etc.
The Corinthian also happens to be Georgette Heyer’s first Regency romance novel. In that genre of early 20th-century literature, Corinthian referred to a most eligible bachelor, with a stolid demeanor, an admirable physique, sympathetic eyes, a healthy sum of inherited money invested in The Funds, and calves that looked just as well out of their Hessians. I’m not sure how much the term was actually used in England during the Regency…
. . . and Old Lace
April 11th, 2013
I’ve been working on another knitted item for my eventual clothing collection — this time it’s a skirt. The overall shape is quite modern, but the bottom boasts a knitted-on lace border adapted from a shawl pattern in Weldon’s Practical Knitter, circa 1885.
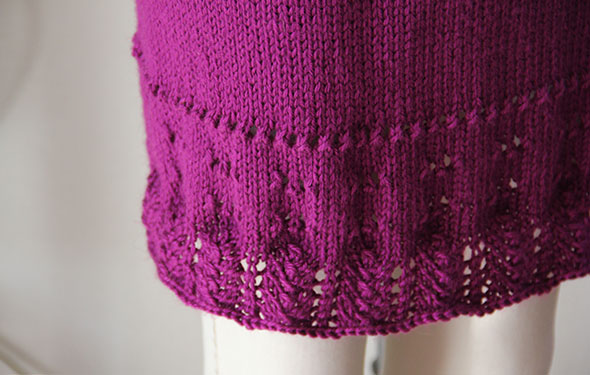
Most lace edgings are knitted lengthwise, then sewn onto the piece. It’s rare to find one knitted into the edge, and even more rare to find one knitted down, rather than up. The original directions suggested knitting a square shawl, then using double-pointed needles to pick up stitches all around the shawl to knit the edging. Those must have been some serious double-pointed needles!
The skirt turned out so well, I’ve already found another shawl edging in a later series from Weldon for variations on the theme…
Fourth Armistice Blouse
January 23rd, 2013
Like evil minions in a science-fiction film, they just keep coming. Here, after more hours of hand-sewing, embroidering, and tatting than I care to count, is armistice blouse number four.
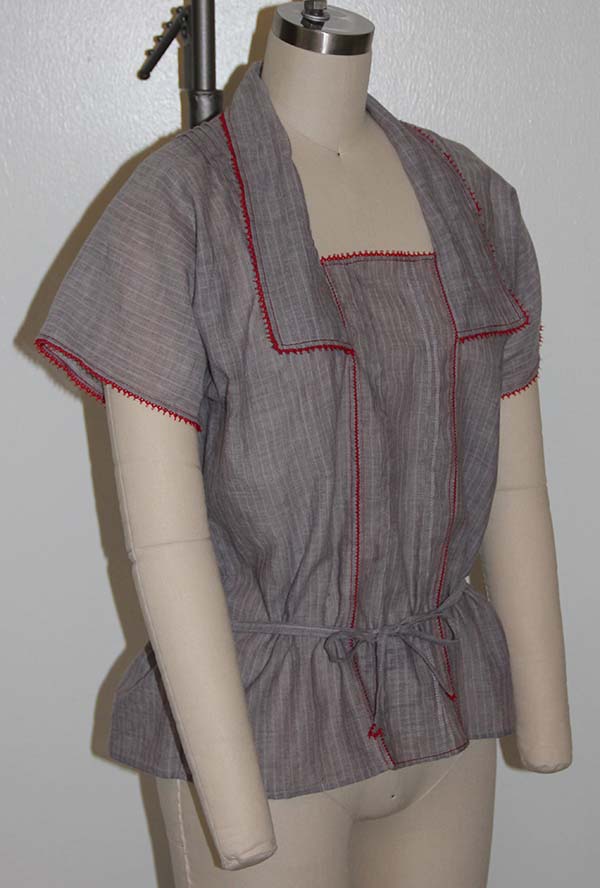
I measured everything perfectly this time, so all the edges have drawn-thread “handkerchief” hems in addition to the tatted lace and fagotting. I also widened and lengthened the collar.
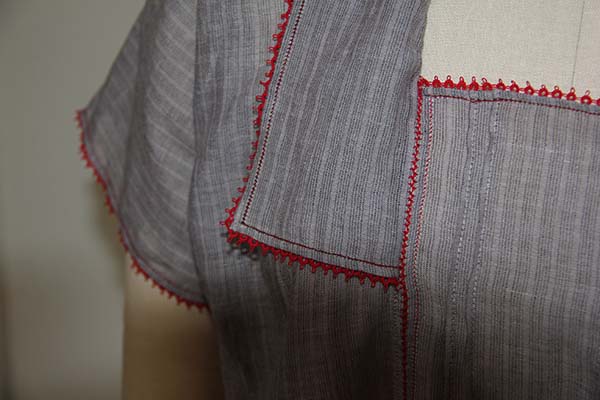
As I’ve said before, this particular design is more of a nod to the late Edwardian style than an accurate reproduction. But I’ve discovered historical precedents for at least two of my modern modifications. It seems that kimono sleeves were a popular style for ladies’ shirtwaists as of 1913. And I found an original “armistice” style blouse from the late 1910s that uses four pintucks over the front shoulder to control fullness around the bust!

Because this is a pull-over (no historical precedent found for that yet — all the originals I’ve seen or looked at in pictures open with buttons on one or both sides of the center panel), I didn’t gather the waist. Instead, I’m using a self-fabric tie, complete with tatted tips, to give the required cinching. I believe the originals with gathered or tied waists were meant to be tucked into skirts…so the tie was never actually seen, just used to control the blousing above.
Version four is the first I’ve felt good enough about to offer for sale. I planned to make lots more just like it, and in different sizes too. But sheesh, this was just too much work. I’d have to charge a fortune. So it’s back to the drawing board, this time for some sewing shortcuts. In the meantime, you can buy this one-of-a-kind blouse for a ridiculously low price right here.
Gotta admit, I’m starting to itch for an authentic armistice blouse too. Maybe once I get the “modern” version perfected, I’ll have to give an historically accurate one a go too.
Third Armistice Blouse
January 3rd, 2013
Eek! What a terrible photograph. But I’m so tired of this blouse, I don’t care enough to take a better one.
Like my second armistice blouse, this one sticks more closely to the early 20th-century form. It’s sheer grey striped cotton, with tatted purple ombre trim, and purple fagotting. I added a set of tiny tucks over each shoulder, which seems to help with the bagging around the underarms. I also fixed the collar issues suffered by the preceding blouse — mostly. I think I will use a piece of bias self-fabric to bind the curved part of the collar seam so I can clip it instead of madly stretching the allowance to fold and bind itself.
The fabric slipped as I was cutting it out, so I wasn’t able to incorporate the handkerchief hem that I used on the second blouse (you need to do that kind of work along a pulled thread). I think that extra line of embroidery added a lot to the feeling of delicacy, and I plan to be very, very careful cutting out the next edition. Without the handkerchief hem, the center panel also ended up a little too wide. So I whipped up a triple line of tatting and used it to pull in the neckline a bit. I really like the effect it adds, but am not sure I want to add any more work to what is already an incredible time consuming design…
Up next — the fourth (and possibly perfect) armistice blouse. Keep your fingers crossed.
(H)at Long Last
December 7th, 2012
*Lest I forget to mention it — you can purchase the hats here*
The pixie hats are done. Finished. Completed. Along with 54 assorted pin-on ribbon & felt flowers. Leaving me only sort of cross-eyed.
Once again, I am left wondering about the D. H. Lawrence connection, but I swear it made sense at the time.

I had a little too much fun adjusting colors on the outdoor shots in Adobe Lightroom …

And of course, the all important interior shot, complete with a view of my brand new embroidered labels.

I think it’s fair to say I would never make it in a sweat shop. I tried to find shortcuts to speed up the production of the hats, but in the end sewed the exteriors completely by hand — including the ribbon binding. I like to think it’s because of my exacting standards, but in truth, I’m sort of lousy at machine sewing. Things just turn out better when I do them by hand. Plus I’ve gotten addicted to the control of hand stitching; I can’t understand why my machine balks at 1/4 inch seam allowances.