
Go Blow Your Nose
July 15th, 2013
It all started with a Father’s Day present . . . a half-dozen monogrammed handkerchiefs, using embroidery directions and an alphabet from The Complete Encyclopedia of Needlework, by T. de Dillmont, 1884. It took a few tries to really get the hang of it, but then I was hooked.
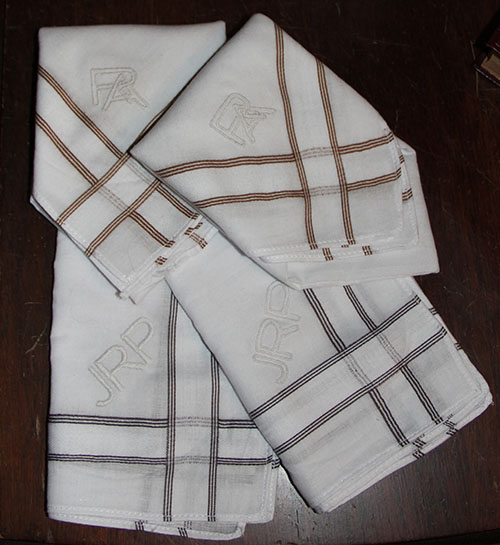
So I began combing my address book for other gents known or suspected to use old-fashioned cotton hankies. And coincidentally (if you believe in coincidence) I just happened to be rereading Ulysses, from whence this gem at the beginning of “Telemachus:”
Buck Mulligan frowned at the lather on his razorblade. He hopped down from his perch and began to search his trouser pockets hastily.
–Scutter! he cried thickly.
He came over to the gunrest and, thrusting a hand into Stephen’s upper pocket, said:
–Lend us a loan of your noserag to wipe my razor.
Stephen suffered him to pull out and hold up on show by its corner a dirty crumpled handkerchief. Buck Mulligan wiped the razorblade neatly. Then, gazing over the handkerchief, he said:
–The bard’s noserag! A new art colour for our Irish poets: snotgreen. You can almost taste it, can’t you?
He mounted to the parapet again and gazed out over Dublin bay, his fair oakpale hair stirring slightly.
–God! he said quietly. Isn’t the sea what Algy calls it: a great sweet mother? The snotgreen sea.
What’s more appealing than a neatly monogrammed, snotgreen noserag?
Brassiere Embroidery
July 18th, 2012
I seem to have a one-track mind lately. When I’m not poring over historical underwear, I’m sewing modern reproductions of it. This is for another Kestos-esque brassiere.

It’s positioned so that the stem will run right into the shoulder strap, and the stamens end just above the bust point. Best of all, since the fabric is cut on the bias, the flower stretches and changes shape with every breath. Of course, it’s unlikely that anyone will see it, since it is, after all, underwear.
I think the stamens need little pale purple dots on each end. I considered beads, but that would be inconvenient for washing. And might look odd under a closely fitted top.
Embroidery Machine
December 17th, 2011
If you’re wondering why it’s been (gasp) more than two whole weeks since my last update, it’s because I am preparing to move 3,000 miles across the country. I’ve been packing madly, and growing more and more astonished at how much stuff we managed to store in our little Greenwich Village garret. Here’s one of the treasures I uncovered.

It came in a cardboard box that promptly disintegrated as soon as I opened it. The instructions were crumpled up, in nearly as poor shape. There was no way to save the box, alas, so I made the instructions my priority.
The paper was torn into three pieces, each one folded up like an accordion. And it was VERY dry. Lacking proper humidification tools, I broke out the steam iron and got to work, gently puffing steam at the paper until it relaxed enough to lay flat.

After a week or so resting between sheets of acid free paper under a heavy book, I was able to piece it together well enough to take this picture (edited a bit to take out the worst of the rips and flaws).

The embroidery machine belonged to one of my forebearers. I wonder what she made with it. I wonder what I’ll make with it…
Achoo
August 15th, 2011
I have just returned from a whirlwind journey, and have a splitting headache. So I’m not going to write anything clever. Besides, they say a picture is worth a thousand words, so here is a picture of the finished handkerchief.

May the bride who carries this enjoy a lifetime of love! And may she pardon my slightly off-kilter stitching…
In case you’re interested, here is the pattern I used, originally published in Godey’s Lady’s Book, August 1850.

Now, back to The Mayor of Casterbridge, which I just began. I sped through Agnes Grey on the train, but will make you wait to hear more about that until I feel I can do it justice.
Fait Acompli
July 30th, 2011
I can hardly believe it, but I have finally finished my broderie anglaise petticoat frill. It’s taken the better part of a year, but it’s really done. Scallops and all. When you add in the months I spent tucking and embroidering the petticoat to which this frill will soon be attached, I’ve spent almost exactly a year and a half on a single petticoat. To be fair, I worked in fits and starts, sometimes ignoring it entirely for 6 weeks. If I was to work steadily, and with the proper materials, I’m sure I would have taken only a fraction of the time.

There’s a great deal wrong with it, but it’s all little technical stuff. Overall, the effect is really rather wonderful (at least to my easily pleased eye) and I can’t wait to see it all put together!
What’s wrong, you ask? Perhaps to avoid pitfalls with your own frills, or maybe you just like to gloat? Well, I’ll tell you. First of all, I wasn’t nearly regular enough in transferring my design. I should have pounced it, or at least taken a bit more care when drawing it on. I also made the circles too small. Then, I used a single thread of standard embroidery floss — made even thinner because it was an off-brand. I should have used real coton a broder, probably in two different sizes for padding and stitching, or at the very least, two strands of the embroidery floss. I might then have made the border round each circle properly thick and glossy.
I’m fairly happy with the scalloped edge though — I used a double strand of floss and it turned out quite nicely. Of course I should have done the bottom row of circles differently, so that they would be more united with the scallops instead of seeming to clash with them. Ah well. There’s always next time.
For now, I have only to put a tiny hem into the top of the frill and sew it under the bottom-most tuck of my petticoat. I haven’t attached the petticoat skirt to a waistband yet. I plan to cartridge pleat it of course, and find some pretty little milk glass buttons for the band. I know tapes would be better, but somehow I just can’t bear the idea of sloppy tapes (tapes are invariably sloppy, no matter how neatly they are arranged) marring my beautiful petticoat.
But before I can fit the skirt for length and balance it, I need my new cage! Yes, at long last I have ordered a cage crinoline kit from Wooded Hamlet. It’s amazing how close they’ve come to matching materials used in actual cage crinolines of the 1850s. But that’s another post entirely…
Also coming up soon — a preview of my someday-to-be-given tell-all lecture on broderie anglaise and its social implications in mid-19th century England & America.
Older Posts »