
HSF #2: UFO
January 28th, 2013
No, I didn’t sew an alien. In costumer slang, UFO stands for “unfinished object.” And like most historically inclined seamstresses, I’ve got plenty of those laying around. As of tonight though, there’s one less.
That’s right, it’s a petticoat. I’m predictable. Deal with it.

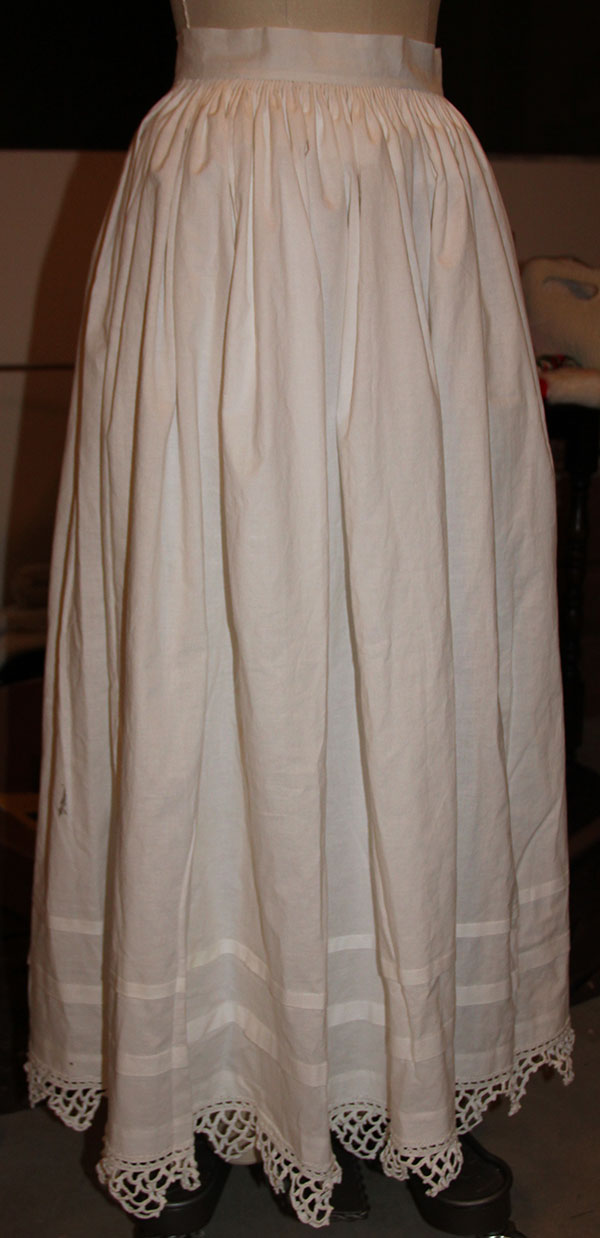
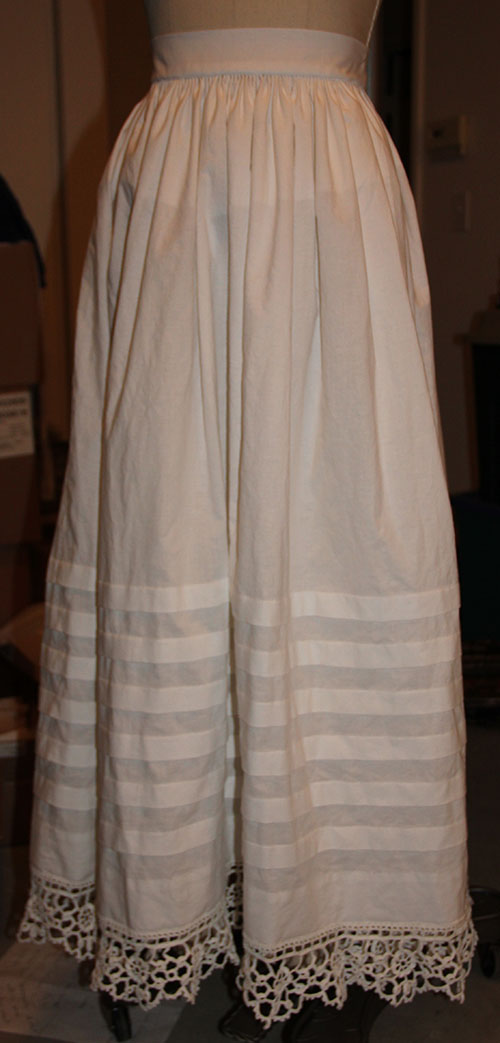
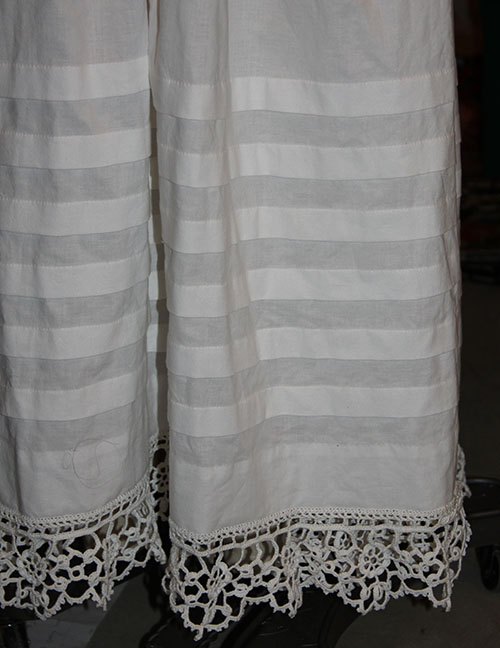
I actually sewed this petticoat a couple years ago. And it’s far from perfect. There’s the whole hem pretending to be a tuck issue. Plus the other two depressingly small and poorly placed tucks. It’s also a little on the short side. Last but not least, it was (until yesterday) missing a waistband.

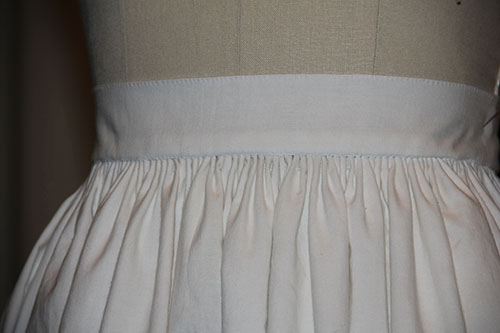
Just as I learned from the mixed up hem on this petticoat (my next petticoat had 6 generous tucks and a proper hem), I also took a few pointers from a previous petticoat waistband. Before, I used a strip of the same cotton as the petticoat itself. It worked okay, but felt a bit flimsy. I also had to reinforce the area where I sewed the buttons. This time, I decided to borrow a trick I’ve seen on a few extent mid-19th century petticoats and make my waistband out of closely woven linen. Truth be told, I simply cut off the wide hem of an old tablecloth, folded the cut edges in, and whipped it closed. Voila! Perfect linen petticoat band.
Just the facts, Ma’am: Previously unfinished mid-19th century petticoat
The Challenge: #2: UFO
Fabric: 45″ wide cotton muslin (calico), the edge of a linen tablecloth
Pattern: Based on mid-19th century directions and extant garments
Year: 1855 (that’s the year the lace pattern was published in Peterson’s)
Notions: 2 mother of pearl pressed buttons, 135 inches of cotton lace
How historically accurate is it? Let’s say 90%. It’s entirely hand-sewn, with hand-crocheted lace from an 1855 pattern. The construction (minus the hem and tuck issues) is pretty much accurate. I used polyester thread. And the buttons are kinda wrong. They should be milk glass or thread probably.
Hours to complete: Who knows at this point! The lace alone took weeks. The petticoat itself is fairly simple, so probably took under 10 hours. Setting the waistband added another 4 or 5.
First worn: Not yet, not for a while. Still need to make that pesky cage. Which, it turns out, can’t be made until I redo my corset. And you wonder why I’ve got a studio littered with “ufo’s”
Total cost: About $15, counting the muslin and the cotton thread. The buttons were a gift from mom and dad way back in my teens (they gave me a huge bag full from a company that operates an antique button press — more accurate for late Victorian/Edwardian). I don’t recall where I got the cannibalized tablecloth.
HSF #0: Starting Simple
January 2nd, 2013
New year, new petticoat. Yep, I’m still me.
Amid the holiday rush, I managed to find a few hours each day to “zen out” on handsewing. The result, a long overdue petticoat for a swath of 1850s-era “guipure” crochet edging I finished more than a year ago. Why now, you ask? What exactly motivated me to finally get this done?
It was the Historical Sew Fortnightly, organized by The Dreamstress, who is one of my very favorite bloggers even though I’ve never met her (I always feel a bit uneasy reading the blogs of people I don’t actually know — sort of like I am stalking them).
Anyways, the idea is that participants are challenged to sew an historical (pre-1938) garment every two weeks for the next year — 26 in all. Each fortnight has a theme around which to organize your project. And best of all, there’s a bustling Facebook group to share research, inspiration, and lots of delicious pictures of the completed projects! This petticoat is my contribution for challenge #0, the pre-challenge. It’s title was “Starting Simple.” Make something fairly easy, and/or something that you’ve made before.
It’s a basic mid-19th century style top-layer petticoat. I used three breadths of 45 inch cotton, sewn up the selvedges and cartridge pleated to a buttoned waistband. Based on this gorgeous example from The Metropolitan Museum, I decided to include 6 tucks above the edging.

As is obvious from the picture of my deflated petticoat at the top of this post, I still need to put my cage crinoline together. I blush to admit I was in such a hurry to finish this, I committed the curatorial sin of using an extant cage crinoline (circa 1860-1865) from my personal collection to balance the petticoat. But I did resist the urge to get it out again for the photograph. I was also too lazy to put on my corset to figure out where to sew the buttons…
Just the facts, Ma’am:
The Challenge: #0 Starting Simple
Fabric: Cotton muslin
Pattern: Based on period directions and extant garments
Year: 1850-56
Notions: 2 mother-of-pearl buttons (I need to learn to make thread buttons!)
How historically accurate is it?About 90%. It’s impossible to get completely accurate materials — for example, the quality and size of the cotton are a little off, and I have a feeling the thread I used for the crocheted edging is the wrong size (it was the right number, but seems a little on the large side). Otherwise, it’s completely hand-sewn with period plain-sewing stitches.
Hours to complete: 20-30. Thanks to those six tucks, I figure I put upwards of 1,200 inches of sewing into this petticoat. Much of it running at 18-stitches-to-the-inch…
First worn: Not for a while yet — I need to finish the cage and/or crinoline, not to mention a whole bunch of other pieces to complete my 1850s wardrobe. This petticoat, along with others, will eventually be part of a mixed-media art exhibit as well.
Total cost: Counting fabric and crochet thread, about $15.
Re-imagined Underwear
July 6th, 2012
I must have particularly bony knees, or kneel more than I realize; within the past six months, nearly all of my jeans have developed holes. Rather than buying another round of denim, I’ve decided to take the opportunity to make a drastic change in my wardrobe.
As any aspiring fashion historian knows, it’s the undergarments that make the clothes. So I will begin by re-imagining my underwear.

Ankle-length skirts will definitely be a staple of my new wardrobe, so I’ll need a petticoat or two to give them shape. And speaking of support, I’m even more anxious to abandon my brassieres than I am to ditch my jeans. So I decided on a bodiced petticoat to offer exterior support below and interior support above. The inset bust cup is cut on the bias and lightly pleated across the top. It’s surprisingly effective.

While the blush-colored cotton for my first petticoat tumbles around the dryer, I cut bias strips from an old cotton shirt. I’ll use them to bind the bodice and straps, and perhaps to pipe the seam under the bust.
Ready for a Petti
October 12th, 2011
My guipure petticoat trim is complete! It measures just a bit longer than 150 inches — perfect to apply to one of my three breadth (of 45 inch muslin) petticoats.

I know this one will have a sufficient hem (for a change). But the question is, how many tucks will it sport? What will be their pattern? No embroidery. At least that’s what I’m thinking right now…
Final Stretch
October 10th, 2011
Actually, I’m now even closer to finishing my latest petticoat edging than when I took this picture…thanks to an evening at home watching movies with my favorite fellow.

I’m working on the final row. It’s going fairly fast — I’m nearly halfway done after just a few hours of work. Good thing too, as I’m getting a little tired of crochet — at least this pattern. And my wrists ache, my fingers are stiff, and there is a nasty bruise on my right palm where the end of the hook rests. Genius is pain.
Next I’ll need a petticoat to sew this to. I think I have just enough muslin left. Tucks seem like the way to go again, since I still have yet to find any evidence of a mid-19th century petticoat sporting both crochet and embroidery.
Older Posts »