Fait Acompli
July 30th, 2011
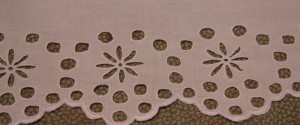
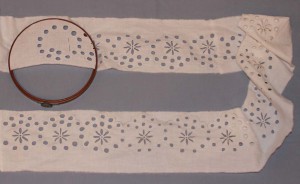
I can hardly believe it, but I have finally finished my broderie anglaise petticoat frill. It’s taken the better part of a year, but it’s really done. Scallops and all. When you add in the months I spent tucking and embroidering the petticoat to which this frill will soon be attached, I’ve spent almost exactly a year and a half on a single petticoat. To be fair, I worked in fits and starts, sometimes ignoring it entirely for 6 weeks. If I was to work steadily, and with the proper materials, I’m sure I would have taken only a fraction of the time.
There’s a great deal wrong with it, but it’s all little technical stuff. Overall, the effect is really rather wonderful (at least to my easily pleased eye) and I can’t wait to see it all put together!
What’s wrong, you ask? Perhaps to avoid pitfalls with your own frills, or maybe you just like to gloat? Well, I’ll tell you. First of all, I wasn’t nearly regular enough in transferring my design. I should have pounced it, or at least taken a bit more care when drawing it on. I also made the circles too small. Then, I used a single thread of standard embroidery floss — made even thinner because it was an off-brand. I should have used real coton a broder, probably in two different sizes for padding and stitching, or at the very least, two strands of the embroidery floss. I might then have made the border round each circle properly thick and glossy.
I’m fairly happy with the scalloped edge though — I used a double strand of floss and it turned out quite nicely. Of course I should have done the bottom row of circles differently, so that they would be more united with the scallops instead of seeming to clash with them. Ah well. There’s always next time.
For now, I have only to put a tiny hem into the top of the frill and sew it under the bottom-most tuck of my petticoat. I haven’t attached the petticoat skirt to a waistband yet. I plan to cartridge pleat it of course, and find some pretty little milk glass buttons for the band. I know tapes would be better, but somehow I just can’t bear the idea of sloppy tapes (tapes are invariably sloppy, no matter how neatly they are arranged) marring my beautiful petticoat.
But before I can fit the skirt for length and balance it, I need my new cage! Yes, at long last I have ordered a cage crinoline kit from Wooded Hamlet. It’s amazing how close they’ve come to matching materials used in actual cage crinolines of the 1850s. But that’s another post entirely…
Also coming up soon — a preview of my someday-to-be-given tell-all lecture on broderie anglaise and its social implications in mid-19th century England & America.
Daring Display
January 4th, 2011
Callooh! Callay! I finished my drawers tonight, stitching down the inside of the waistband, sewing on three buttons, and making (shudder) three buttonholes.

Shell buttons, made on an antique, though I doubt mid-19th century, press. They are arranged in a slanted fashion to accommodate my curves throughout this very wide (1.5 nails or a little less than 3.5 inches!!) waistband.

Miserable, wretched buttonholes (I abhor buttonholes). Worked according to directions from the Workwoman’s Guide, which suggested that sewing around the edge of the buttonhole adds a nice effect. I am not entirely sure I agree — looks a bit sloppy to me.
In celebration, I am doing something very daring: presenting pictures of myself wearing split leg drawers, and nothing else. Forgive me if I shock the more timid among you with my excessive boldness. Please pardon my messy house and enormous feet.


And a close up of my Broderie Anglaise frill.
Drawers Won
December 27th, 2010
I am now officially halfway done with my embroidered petticoat frill, and felt I deserved a little time off. So I opted to cut out a new pair of drawers. Even though it’s from 1838, I used the Workwoman’s Guide pattern.

The measurements given in the text are for a “moderate” size, which just happens to have a 25″ waistband! Of course that doesn’t include room for overlapping to button or tie, so they’re probably more like a 24″ waist, but that’s an easy enough adjustment. Even though I am rather tall by mid-19th century standards (average height was about 5 feet 2 inches while I measure in at slightly more than 5 feet 7 inches), I didn’t add any length in the crotch, yet they are still sufficiently roomy. I did include an extra inch in the leg — had I been aiming for a true 1838 pair of drawers, I might have added more to the leg, but my understanding of drawers is that they gradually got shorter and puffier as the century wore on (and as cage crinolines introduced the possibility that your skirt might fly up and reveal a peek of stockinged leg — or, heaven forbid, the edge of your drawers). Read on…
Nearly Halfway
December 18th, 2010
Last March I began a truly monumental project: to whit, a hand-sewn, tucked, embroidered petticoat based on an 1854 Practical Dress Instructor pattern from Godey’s Lady’s Book. The skirt, comprising 3 panels of 45 inch “calico” (modern cotton muslin) was finished in relatively short order, including 6 hand-sewn tucks and a 2 inch wide insertion of white-on-white embroidered morning glories going all the way around the bottom. I’ll post pictures once I dig it out of my sewing closet, where it has been peacefully reposing for some time now.
Then it was on to the frill in Broderie Anglaise. And that’s where I’ve been stuck for the past 6 months. Cutting and stitching, cutting and stitching, all with a single thread of embroidery floss. I’m finally nearing the halfway point on the cut-work. When all 135 inches are finally complete, I’ll go back over it again to buttonhole the scalloped edge.


