Something to Sneeze At
August 1st, 2011
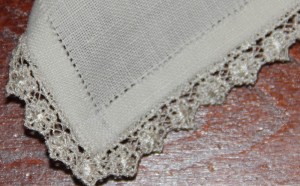
I made a little detour this weekend and hemmed a linen handkerchief.
It’s a tedious but simple process — cutting the linen square to a thread, pulling a single thread for each fold of the hem, then a double thread where it’s to be sewed down. The corners are mitered of course, which is easy to do once the threads have been pulled. I sewed the hem with embroidery floss, wrapping it around three threads at a time to create the signature dotted line that has graced fine linen handkerchiefs for centuries past.
This particular one is edged with some delicate floral lace from my bag of bits and pieces. And yes, I plan to embroider something on one of the corners, but you’ll just have to wait to find out what. It’s a gift, so must be kept under wraps until I deliver it. It’s on the large side for a lady’s formal handkerchief — nearly 12 inches square — but since the lace is so tiny, I decided to err on the generous side.
I’d love to see handkerchiefs that you’ve made. For inspiration, here’s one from the genius behind Costume & Construction. Perhaps I’ll make another soon and write a more detailed post about their proper construction and stitching.
Fait Acompli
July 30th, 2011
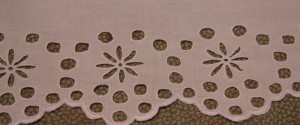
I can hardly believe it, but I have finally finished my broderie anglaise petticoat frill. It’s taken the better part of a year, but it’s really done. Scallops and all. When you add in the months I spent tucking and embroidering the petticoat to which this frill will soon be attached, I’ve spent almost exactly a year and a half on a single petticoat. To be fair, I worked in fits and starts, sometimes ignoring it entirely for 6 weeks. If I was to work steadily, and with the proper materials, I’m sure I would have taken only a fraction of the time.
There’s a great deal wrong with it, but it’s all little technical stuff. Overall, the effect is really rather wonderful (at least to my easily pleased eye) and I can’t wait to see it all put together!
What’s wrong, you ask? Perhaps to avoid pitfalls with your own frills, or maybe you just like to gloat? Well, I’ll tell you. First of all, I wasn’t nearly regular enough in transferring my design. I should have pounced it, or at least taken a bit more care when drawing it on. I also made the circles too small. Then, I used a single thread of standard embroidery floss — made even thinner because it was an off-brand. I should have used real coton a broder, probably in two different sizes for padding and stitching, or at the very least, two strands of the embroidery floss. I might then have made the border round each circle properly thick and glossy.
I’m fairly happy with the scalloped edge though — I used a double strand of floss and it turned out quite nicely. Of course I should have done the bottom row of circles differently, so that they would be more united with the scallops instead of seeming to clash with them. Ah well. There’s always next time.
For now, I have only to put a tiny hem into the top of the frill and sew it under the bottom-most tuck of my petticoat. I haven’t attached the petticoat skirt to a waistband yet. I plan to cartridge pleat it of course, and find some pretty little milk glass buttons for the band. I know tapes would be better, but somehow I just can’t bear the idea of sloppy tapes (tapes are invariably sloppy, no matter how neatly they are arranged) marring my beautiful petticoat.
But before I can fit the skirt for length and balance it, I need my new cage! Yes, at long last I have ordered a cage crinoline kit from Wooded Hamlet. It’s amazing how close they’ve come to matching materials used in actual cage crinolines of the 1850s. But that’s another post entirely…
Also coming up soon — a preview of my someday-to-be-given tell-all lecture on broderie anglaise and its social implications in mid-19th century England & America.
Crochet Edging
January 17th, 2011
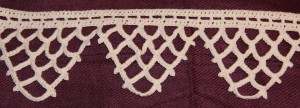
Here’s another edging, recommended for petticoats, from Peterson’s, 1855.

The pattern was remarkably well written and easy to follow, especially with the clear and accurate illustration. I still haven’t figured out how to gauge sizes on 19th-century cotton, but I’ve found some patterns for very fine tatted lace that call for no. 20 or 30 boar’s-head cotton, and directions for a coverlet calling for no. 10. So I am going to presume that, like today, the higher size numbers indicate finer thread. This pattern bears that out as well, asking no. 10 for a petticoat trim, but 16 or 20 for a child’s drawers.
I used what I had on hand to make up a sample — modern no. 16 cotton and a 1.3 mm hook. I don’t think I’d want to trim a petticoat with anything thicker than a modern no. 16; this is a pretty edging, but a bit on the stiff side already. It does seem strong, which was a frequently stated prerequisite for any undergarment trimming (they boiled their laundry, then it was wrung out, and finally put it through a mangle).
Best of all, even though it is worked over the full required length for the first four rows, it does work up relatively quickly. I wouldn’t mind making 100 or so inches of this to trim a petticoat. Someday.
Guipure Trimming
January 11th, 2011
Some women indulge themselves with expensive perfumes, dark chocolate, or spa visits. I subscribe to Accessible Archives. For a modest yearly fee, I can search every issue of Godey’s Lady’s Book ever published, not to mention lots of other great historical sources. The only down side is that since I find whatever I want immediately, I rarely bother to browse. And browsing is the best way to come across what you aren’t looking for.
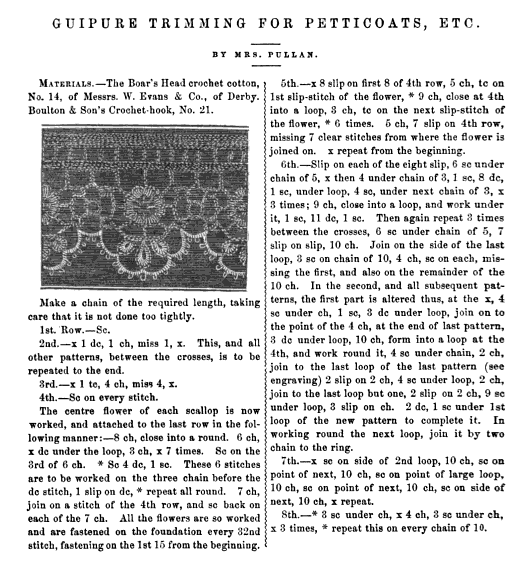
Peterson’s Magazine, a Godey’s copycat, is searchable only through a very expensive academic database. So I read back issues, bound by the year, thanks to Google Books. I was browsing Peterson’s 1855 for chemise patterns when this showed up:

Given my recent obsession with petticoat trimming, I earmarked it for a trial run. And last week, I pulled out my crochet hook and a skein of cotton thread and whipped up 4 repeats of the pattern. Since the way thread and needle sizes are designated have changed since the 1850s, it’s always a bit of a guessing game to see which you should use. I had number 16 cotton on hand, and a size 10 (1.3 mm) crochet hook. The hook was a little small for the thread, but the next one up in my kit was far too big.
I really like the way this pattern looks. Though I would prefer a finer thread. Probably a great deal finer. Like most crochet edgings, it starts with a chain as long as you will require. There are only 7 rows, but at least two are quite involved. I think it would be slow going to trim a full petticoat, though not nearly so slow as Broderie Anglaise. And the effect would likely be stunning.
I had to fiddle with the pattern a little to make it work; thank heavens for the picture, which helped with intuitive leaps when the written directions became unclear. Some of the changes I made might not have been necessary though if I’d been using finer thread…and the end result would likely have been neater.
Oh, and if you are afflicted with curiosity, like me and the cat, real guipure is a heavy needlepoint lace in which the patterns are connected by thread ties or mesh. True lace, which was phenomenally expensive in the mid-19th century, was often imitated by crochet. One of the most noted examples of this is the legendary Irish crochet: “faux” laces created with great dexterity and sold by women to support their families during the Famine. Incidentally, by the end of the 19th century, exquisite Irish crochet was valued on its own merits, rather than its ability to mimic more expensive laces.
« Newer Posts


