Oh, So Close
March 31st, 2011
While battling a spring cold, I’ve been finishing my latest stay mock-up. I decided to sew these by machine — partly because there is simply too little time in life to hand-sew mock-ups, but mostly because I’m using a ridiculously heavy brushed twill that is completely impossible to hand-sew.
The good news is that they fit MUCH better now that I’ve changed the angle of the stomach gores. I also figured out that the key to a straight busk is not so much the rigidity of the material used, but the width. Two half-inch spring steel stays running next to one another are far superior to the same two spring steels stacked one on top of the other!
They are also incredibly comfortable. I’ve been wearing them for almost an hour now, and am in no hurry to take them off. I actually enjoy the support.
Here’s the bad news. I’ve got horizontal wrinkles. Ah me. I don’t remember if they were this pronounced in the last version. So many other things were wrong there that I might not have noticed. It seems these can be caused by too much length, though I don’t really think that’s the problem here. They can also be a lack of boning, but I think the folds are too severe to be fixed by an extra bone. So that means I have the gussets or side seam in the wrong place. Perhaps too close to the center front? Alas, alack. More fitting.
It does seem to improve a little when I tug the stays higher, but they always fall back down again. The back is kind of wrinkly all the way down, but I think it’s alright. Unlike the front, the back is cut on the straight grain, so it’s got less of that forgiving stretch. It’s definitely a problem in the front.
Suggestions welcome! I am off to beg advice wherever I can find it.
P.S. I do feel quite justified in using my sewing machine as this pattern was published by Peterson’s and Godey’s in 1855 and 1857 respectively. And the sewing machine was definitely making inroads into American homes by then!
I Need Coutil
March 21st, 2011
I’m working on a new mock-up, trying out the reworked stomach and hip gores for my ongoing battle of the stays. I am so tired of mock ups. So last night, I started day dreaming (can one day dream at night?) about the far-distant time when I will finally make a real, functional pair of stays. It seems I need coutil. Though I am not sure if the coutil I need is the same as the fabric currently sold under the name coutil.
According to Godey’s 1857 (via Peterson’s 1855) stay pattern, I need half a yard of material. But what kind of material? The Workwoman’s Guide says “If for ladies, they are made of satine, or best French jean… if of an inferior quality, they are made of white, brown, grey, or nankeen jean… and lined with calico between the doubles.”
According to Dictionary of Textiles, 1920:
Corset Jean—Very strong, stout jean, made of pure cotton or linen, in twill or broken twill weave, in white, and for corsets, etc.
Coutille—French jean of zigzag pattern for corsets. See Coutil 4.
Coutil—1, French and German stout drills, made of linen, hemp or cotton; 2, French and English fabrics, made of pure cotton; used for bedcovers, drapery, trousers, etc., often printed; 3, a fine worsted trousering in France; 4, very strong, stout cotton or linen fabric, woven in herringbone twill; used for corsets.
Satine—Cotton satin, see sateen.
Sateen—Stout, lustrous piece dyed cotton fabric, made in satin weave (see) either in warp or filling flush. Also comes printed or in stripes; used for lining dresses, skirts, shoe lining, etc.
Which would explain why the 1840s stays in the Met Collection that I posted about last week look like they are made of polished cotton. They are satine!
An important note — while The Workwoman’s Guide stays are meant to be double-thick and lined, the Godey’s/Peterson’s are single layer. So satine may be too flimsy for that kind of construction. I may eventually try the pattern with a double layer, but for now, I just want to get it right as written. I believe a nice stout coutil is what I’m after.
There. A hopelessly arcane and dull post with absolutely no pictures. Blech.
Stitch Not In Time
March 4th, 2011
Alright, alright, I’ve learned my lesson. Don’t make hand-sewn undergarments out of plain muslin. It’s oh, so tempting at less than $2 a yard (actually, it might as well be free — I’m still sewing through a bolt of white cotton muslin that my mother bought for me a decade ago). But look what happened to the chemise I made last year. I’ve only worn it three or four times too.

I think it might have ripped while I was fitting my new stays, twisting around this way and that, trying to slide into them without unlacing. Drat!
Always one to look for the silver lining, I have decided to use this as an excuse to practice my mending. Many of the manuals that I used to learn 19th-century hand-sewing have extensive sections on mending, including this catechism from England’s Finchley School manual Plain Needle-Work, in All Its Branches, 1852:
PATCHING.
Q. You have told me how you would manage a sheet, or any large coarse article; but should the linen, cotton, or whatever the material may be requiring a patch, be of a finer description, or printed in colours, how would you proceed?
A. I would cut the piece with which I intended to repair, exactly to a thread, and place it on the decayed or worn part, to a thread also, and on the right side; taking care, should the article have any pattern, to fix the patch so as to make the parts of the pattern correspond.
Q. “What next?
A. I then tack the patch on slightly, to keep it ia its place, and sew it at the edges in the manner of a hem, taking care to manage the corners neatly.
Q. And then?
A. Having made the cloth very flat and smooth, I carefully cut out the old piece on the wrong side, leaving sufficient to form a hem, the same as in patching a sheet.
Q. How do you manage to make the hem sit neatly at the corners?
A. I nick it a little, at each of the four corners, carefully turning-in the raw edges, making allowance for turning them in, and then proceed with the hem.
And just in case I’m tempted to put speed ahead of quality (especially since I need to rip out the armhole facing and hem it back down again over the patch):
“Patches should always be well shaped, and basted on perfectly even; a round, angular, or slanting patch, is the sure sign of a slut.”
The Girl’s Own Book, by Lydia Maria Child, 1853
Anyone having a sale on Kona cotton broadcloth? Or should I finally break into that stash of cream linen for my next chemise?
Almost, Almost
March 2nd, 2011
I’m pleased to report that I’ve bound my stays, and made a little buttonhole at the bottom of each stay place. All that’s left now is the flossing. It’s a great relief to be nearly finished with these — they’ve been quite a long time coming. However there are so many things wrong with them — I’m eager to start my next pair already. Most of the deficits are the result of imperfect materials.
The fabric (even though it came in a corset kit) isn’t quite right, being a single directional twill instead of a true coutil, and it’s too light to even qualify as fine jean. It probably would have been fine for a double layer corset, but it’s just not strong enough for unlined stays. The busk is all wrong. It’s too narrow, two floppy (even though I used two thick steel bones), and too long. I am now convinced that I need to do a little more research and then have a busk custom made. The metal eyelets for the lacing should be bone or ivory (French holes), though I don’t really see where I am to get those. Perhaps, if I can’t find evidence that metal eyelets were available in the 1850s, I will have to work them by hand in the future.
As for fit, I will know more once I’ve worn them for a while. Right off the bat, I think I need to make the back hip gores a little smaller. The bust may or may not need to be enlarged slightly. I’m also not too sure about the side bones. They weren’t in the original pattern, and they were pinching a bit last night. Luckily I can slide them in and out right now, so will try both ways.
About being able to slide the bones in and out…I think that’s a marvelous feature, and one I haven’t seen on any modern corset patterns. It makes some form of flossing (functional embroidery to hold the bones in place) mandatory however. The pattern suggests drilling a hole in each end of the bones and actually sewing through it, over the end of the bone. However I don’t have a jeweler’s drill yet, so I think I am going to go with later flossing patterns, which merely criss-cross the bone rather than sewing straight through it. I guess they must date from the point when bones became steel.
And that’s all that’s left to do. So I’m off to floss and then to wear it around for a while. Or maybe vice versa, in case I want to remove the side bones after all.
Past Projects: Shift
February 13th, 2011
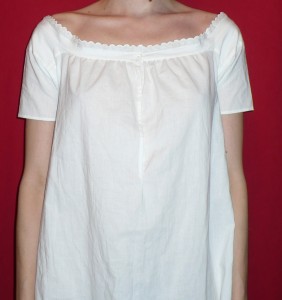
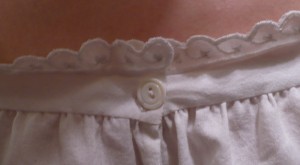
This garment, my first (and only, to date) 1850s shift, aka chemise*, is a bit of a jumble. It looks fine from a distance, but the fact is I alternated between 5 different sets of directions, which occasionally contradicted each other outright. There were also a few spots (mostly around the neckline) that every set of directions glossed over, so I simply guessed. I need to start visiting costume collections to look at extant garments to see all those little details!
The 1850s was a time of change for most female undergarments, many of which had remained stable in shape for decades previously. Last summer I made a shift from the 1838 Workwoman’s Guide. It was much more simply cut than this one, and ended up being enormous because I made it according to one of the larger sizes given. I gave it away to a photographer for use as a prop.
I do plan to experiment some more with the Workwoman’s Guide patterns (and will probably give away the results), until I get the sizing right. Even though the shape they take is old fashioned compared to illustrations in 1850s magazines, it’s still very much acceptable for the period. Makes sense, since many of the women who were sewing shifts in the 1850s had learned to make them a decade earlier.
As you’ve probably guessed by my previously stated predilections, this shift is entirely hand sewn. I embroidered the scalloped band, based on the simplest pattern I could find in Godey’s.
*Like the shape of the shift, the name also changed in the 1850s. By the end of the decade most people in America and England had adopted the French moniker Chemise.
« Newer Posts — Older Posts »


