Oh, So Close
March 31st, 2011
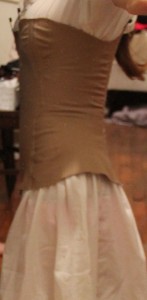
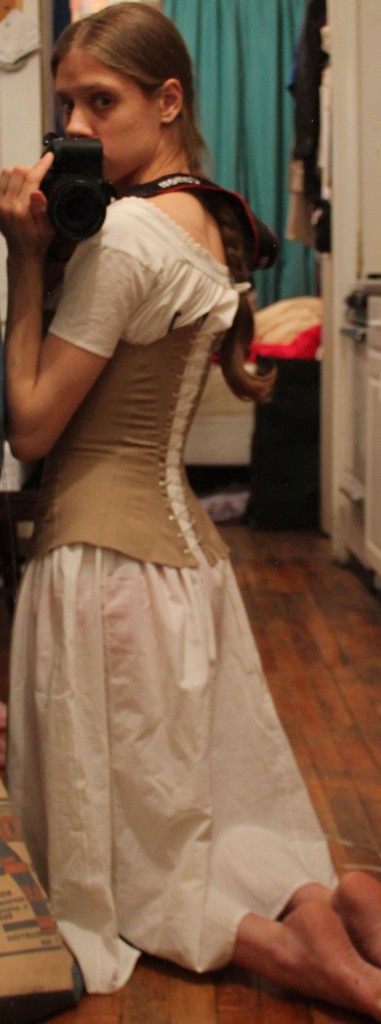
While battling a spring cold, I’ve been finishing my latest stay mock-up. I decided to sew these by machine — partly because there is simply too little time in life to hand-sew mock-ups, but mostly because I’m using a ridiculously heavy brushed twill that is completely impossible to hand-sew.
The good news is that they fit MUCH better now that I’ve changed the angle of the stomach gores. I also figured out that the key to a straight busk is not so much the rigidity of the material used, but the width. Two half-inch spring steel stays running next to one another are far superior to the same two spring steels stacked one on top of the other!
They are also incredibly comfortable. I’ve been wearing them for almost an hour now, and am in no hurry to take them off. I actually enjoy the support.
Here’s the bad news. I’ve got horizontal wrinkles. Ah me. I don’t remember if they were this pronounced in the last version. So many other things were wrong there that I might not have noticed. It seems these can be caused by too much length, though I don’t really think that’s the problem here. They can also be a lack of boning, but I think the folds are too severe to be fixed by an extra bone. So that means I have the gussets or side seam in the wrong place. Perhaps too close to the center front? Alas, alack. More fitting.
It does seem to improve a little when I tug the stays higher, but they always fall back down again. The back is kind of wrinkly all the way down, but I think it’s alright. Unlike the front, the back is cut on the straight grain, so it’s got less of that forgiving stretch. It’s definitely a problem in the front.
Suggestions welcome! I am off to beg advice wherever I can find it.
P.S. I do feel quite justified in using my sewing machine as this pattern was published by Peterson’s and Godey’s in 1855 and 1857 respectively. And the sewing machine was definitely making inroads into American homes by then!
I Need Coutil
March 21st, 2011
I’m working on a new mock-up, trying out the reworked stomach and hip gores for my ongoing battle of the stays. I am so tired of mock ups. So last night, I started day dreaming (can one day dream at night?) about the far-distant time when I will finally make a real, functional pair of stays. It seems I need coutil. Though I am not sure if the coutil I need is the same as the fabric currently sold under the name coutil.
According to Godey’s 1857 (via Peterson’s 1855) stay pattern, I need half a yard of material. But what kind of material? The Workwoman’s Guide says “If for ladies, they are made of satine, or best French jean… if of an inferior quality, they are made of white, brown, grey, or nankeen jean… and lined with calico between the doubles.”
According to Dictionary of Textiles, 1920:
Corset Jean—Very strong, stout jean, made of pure cotton or linen, in twill or broken twill weave, in white, and for corsets, etc.
Coutille—French jean of zigzag pattern for corsets. See Coutil 4.
Coutil—1, French and German stout drills, made of linen, hemp or cotton; 2, French and English fabrics, made of pure cotton; used for bedcovers, drapery, trousers, etc., often printed; 3, a fine worsted trousering in France; 4, very strong, stout cotton or linen fabric, woven in herringbone twill; used for corsets.
Satine—Cotton satin, see sateen.
Sateen—Stout, lustrous piece dyed cotton fabric, made in satin weave (see) either in warp or filling flush. Also comes printed or in stripes; used for lining dresses, skirts, shoe lining, etc.
Which would explain why the 1840s stays in the Met Collection that I posted about last week look like they are made of polished cotton. They are satine!
An important note — while The Workwoman’s Guide stays are meant to be double-thick and lined, the Godey’s/Peterson’s are single layer. So satine may be too flimsy for that kind of construction. I may eventually try the pattern with a double layer, but for now, I just want to get it right as written. I believe a nice stout coutil is what I’m after.
There. A hopelessly arcane and dull post with absolutely no pictures. Blech.
Almost, Almost
March 2nd, 2011
I’m pleased to report that I’ve bound my stays, and made a little buttonhole at the bottom of each stay place. All that’s left now is the flossing. It’s a great relief to be nearly finished with these — they’ve been quite a long time coming. However there are so many things wrong with them — I’m eager to start my next pair already. Most of the deficits are the result of imperfect materials.
The fabric (even though it came in a corset kit) isn’t quite right, being a single directional twill instead of a true coutil, and it’s too light to even qualify as fine jean. It probably would have been fine for a double layer corset, but it’s just not strong enough for unlined stays. The busk is all wrong. It’s too narrow, two floppy (even though I used two thick steel bones), and too long. I am now convinced that I need to do a little more research and then have a busk custom made. The metal eyelets for the lacing should be bone or ivory (French holes), though I don’t really see where I am to get those. Perhaps, if I can’t find evidence that metal eyelets were available in the 1850s, I will have to work them by hand in the future.
As for fit, I will know more once I’ve worn them for a while. Right off the bat, I think I need to make the back hip gores a little smaller. The bust may or may not need to be enlarged slightly. I’m also not too sure about the side bones. They weren’t in the original pattern, and they were pinching a bit last night. Luckily I can slide them in and out right now, so will try both ways.
About being able to slide the bones in and out…I think that’s a marvelous feature, and one I haven’t seen on any modern corset patterns. It makes some form of flossing (functional embroidery to hold the bones in place) mandatory however. The pattern suggests drilling a hole in each end of the bones and actually sewing through it, over the end of the bone. However I don’t have a jeweler’s drill yet, so I think I am going to go with later flossing patterns, which merely criss-cross the bone rather than sewing straight through it. I guess they must date from the point when bones became steel.
And that’s all that’s left to do. So I’m off to floss and then to wear it around for a while. Or maybe vice versa, in case I want to remove the side bones after all.
Fits & Puckers
February 2nd, 2011
I continue to make slow but steady progress on my stays. Last weekend I finished hemming in the stay tape (where it was indicated on the 1855/1857 pattern) and sewing a self-fabric busk casing (because I was too lazy to go uptown for 3/4″ webbing). I filled the channels with my zip ties, pinned the busk in place, and laced it up
The fit is very promising, but there are still a few issues. Mostly the problems are with my materials. I’m using plain twill fabric that came with a corset kit I never made, and it’s far too flimsy for single layer stays. I think that’s (partly) why it’s puckering around the gores. Also, the 1/2″ steel bone I bought to fill in until I can get someone to make me a real busk is way too flexible. It looked like I was wearing a spoon busk! Corsetmaking.com sells an extra thick boning that may do the trick. I need to order laces anyway, so I’ll give it a try.
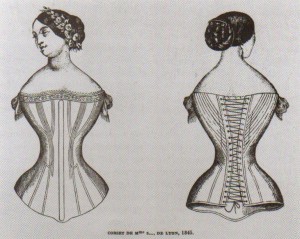
I’m also going to put in some more full-length bones in hope that they will eliminate some of the worst puckers. As written, the pattern only has full-length support at the center front (busk) and flanking the lacing holes. I am hemming in tapes for side bones as I write. And if they don’t do the trick, I may also put full-length bones next to the existing half-bone between the bust gores, as shown in this 1845 French ad:
Going back to the fabric again, I think I will swallow my reluctance to pay $30 a yard for cotton fabric and purchase some real coutil for my next single layer stays. I’m also anxious to try a double layer version, as described in the Workwoman’s Guide. An added advantage to two layers — you can strengthen areas that don’t quite need boning with cords!
Regardless, I am actually very happy with the pattern and look forward to having a pair of working stays so that I can start fitting some actual dresses. I can’t believe I was worried about having too much spring though…these will lace nearly closed if I tug at them, taking my waist down to 24 inches instead of the planned 25. Eek!
P.S. There are now a couple of tiny blood stains on the front of the stays, where I tore my fingers on the pin holding in the busk. Just in case you wanted to know absolutely everything.
Oh Drat
January 16th, 2011
Having received the steel boning and twill tape that I ordered from Lacis, I set about putting the rest of my new stays together. But all is not well. Let me not alarm you — nothing is lost, it will all come right in the end; but for the moment, I am exceedingly frustrated.
1stly, the half-inch steel boning that I ordered seems far too flexible to make a good busk. Luckily I ordered 4 steels, so I can double it should my suspicions prove correct. I really think I will have to commission a metal worker to make a busk for my next pair of stays.
2ndly, as I prepared to hem in the bone casing for the wee little bones at the top front, I realized that my stomach gores are too short nearly by half. This would explain their ill-fit as well I guess. But it also means I need to tear out the stitching, extend the slits, and cut new gores to go into the spaces. Oh me, oh my.
3rdly, I am having trouble telling exactly where the boning is meant to go. I know there are two long bones flanking the rows “french holes” up each side of the back. There is also a pair of short bones going diagonally across the top half of the back. There seem to be another set of the same in the middle of the front. I think there are also meant to be bones between each set of bust gores, extending down to just shy of the stomach gore. But I find no evidence of side bones under the arms on the illustration or in the directions. The Workwoman’s Guide, written nearly 15-20 years earlier, but describing nearly the same form, does mention bones at the side…
And lastly, I realize that I will need to cut and sew a tiny buttonhole at the bottom of each bone place in order to insert or remove the bones once the stays have been bound. Did I mention that I hate buttonholes?
On a more cheerful note, I discovered the exact same pattern and directions from which I’ve been working (found by your faithful correspondent in Godey’s, 1857) in a copy of Peterson’s, 1855! So they are indeed earlier than the cage crinoline. And Godey’s should be ashamed for stealing so unabashedly.
« Newer Posts — Older Posts »


