HSF #2: UFO
January 28th, 2013
No, I didn’t sew an alien. In costumer slang, UFO stands for “unfinished object.” And like most historically inclined seamstresses, I’ve got plenty of those laying around. As of tonight though, there’s one less.
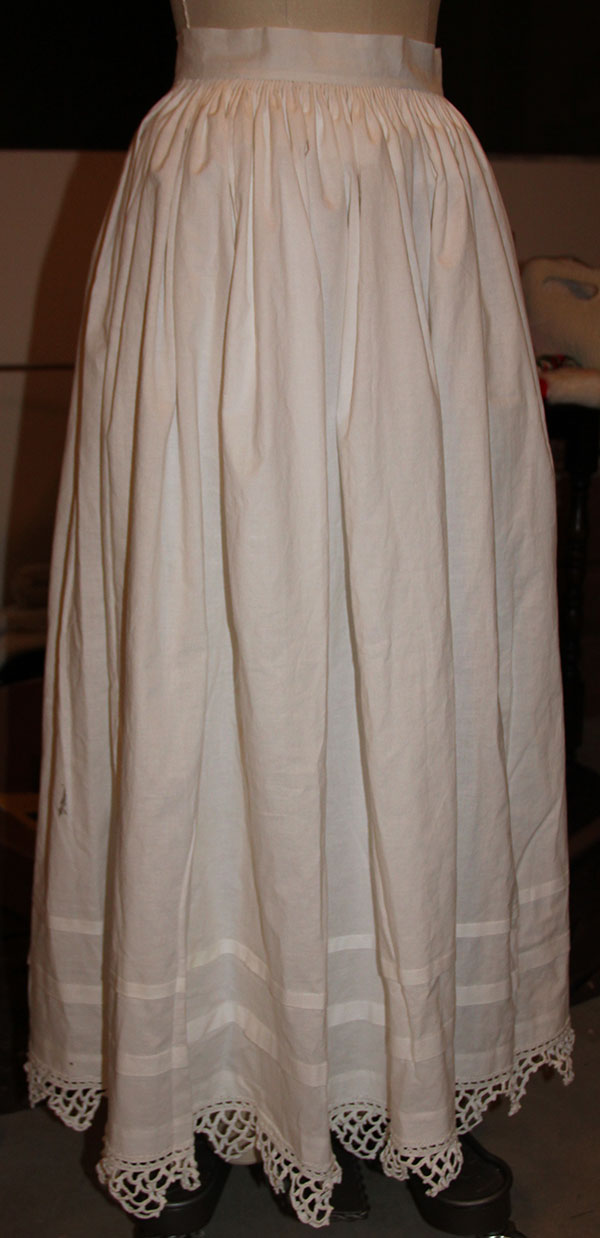
That’s right, it’s a petticoat. I’m predictable. Deal with it.

I actually sewed this petticoat a couple years ago. And it’s far from perfect. There’s the whole hem pretending to be a tuck issue. Plus the other two depressingly small and poorly placed tucks. It’s also a little on the short side. Last but not least, it was (until yesterday) missing a waistband.

Just as I learned from the mixed up hem on this petticoat (my next petticoat had 6 generous tucks and a proper hem), I also took a few pointers from a previous petticoat waistband. Before, I used a strip of the same cotton as the petticoat itself. It worked okay, but felt a bit flimsy. I also had to reinforce the area where I sewed the buttons. This time, I decided to borrow a trick I’ve seen on a few extent mid-19th century petticoats and make my waistband out of closely woven linen. Truth be told, I simply cut off the wide hem of an old tablecloth, folded the cut edges in, and whipped it closed. Voila! Perfect linen petticoat band.
Just the facts, Ma’am: Previously unfinished mid-19th century petticoat
The Challenge: #2: UFO
Fabric: 45″ wide cotton muslin (calico), the edge of a linen tablecloth
Pattern: Based on mid-19th century directions and extant garments
Year: 1855 (that’s the year the lace pattern was published in Peterson’s)
Notions: 2 mother of pearl pressed buttons, 135 inches of cotton lace
How historically accurate is it? Let’s say 90%. It’s entirely hand-sewn, with hand-crocheted lace from an 1855 pattern. The construction (minus the hem and tuck issues) is pretty much accurate. I used polyester thread. And the buttons are kinda wrong. They should be milk glass or thread probably.
Hours to complete: Who knows at this point! The lace alone took weeks. The petticoat itself is fairly simple, so probably took under 10 hours. Setting the waistband added another 4 or 5.
First worn: Not yet, not for a while. Still need to make that pesky cage. Which, it turns out, can’t be made until I redo my corset. And you wonder why I’ve got a studio littered with “ufo’s”
Total cost: About $15, counting the muslin and the cotton thread. The buttons were a gift from mom and dad way back in my teens (they gave me a huge bag full from a company that operates an antique button press — more accurate for late Victorian/Edwardian). I don’t recall where I got the cannibalized tablecloth.
Fourth Armistice Blouse
January 23rd, 2013
Like evil minions in a science-fiction film, they just keep coming. Here, after more hours of hand-sewing, embroidering, and tatting than I care to count, is armistice blouse number four.
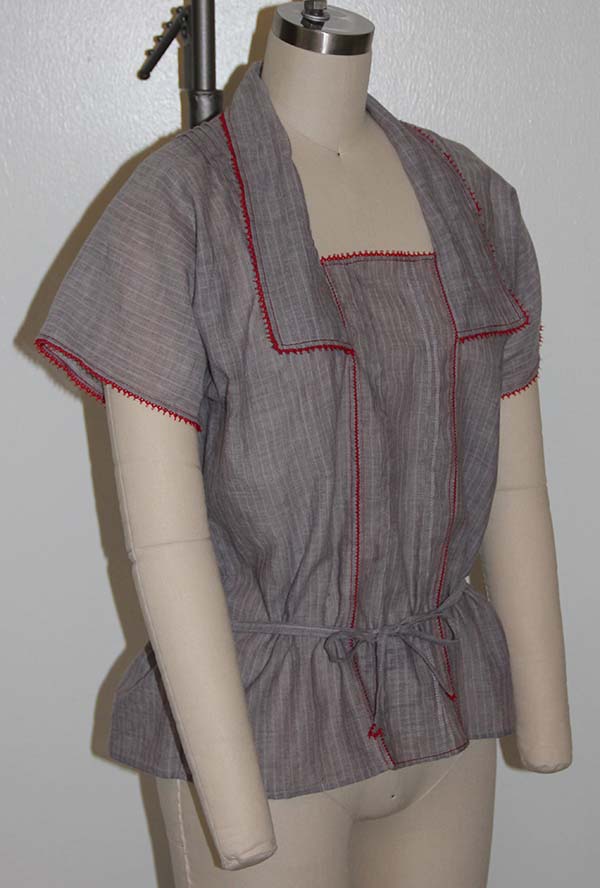
I measured everything perfectly this time, so all the edges have drawn-thread “handkerchief” hems in addition to the tatted lace and fagotting. I also widened and lengthened the collar.
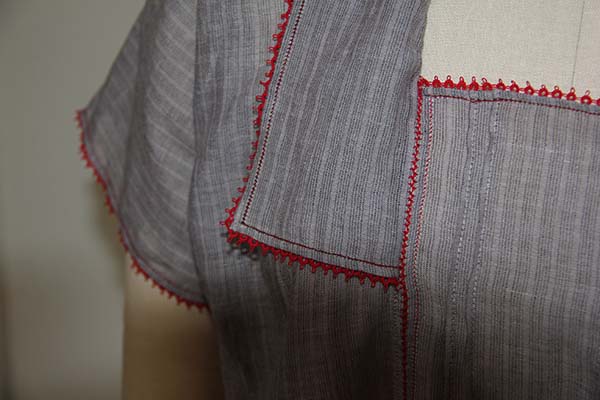
As I’ve said before, this particular design is more of a nod to the late Edwardian style than an accurate reproduction. But I’ve discovered historical precedents for at least two of my modern modifications. It seems that kimono sleeves were a popular style for ladies’ shirtwaists as of 1913. And I found an original “armistice” style blouse from the late 1910s that uses four pintucks over the front shoulder to control fullness around the bust!

Because this is a pull-over (no historical precedent found for that yet — all the originals I’ve seen or looked at in pictures open with buttons on one or both sides of the center panel), I didn’t gather the waist. Instead, I’m using a self-fabric tie, complete with tatted tips, to give the required cinching. I believe the originals with gathered or tied waists were meant to be tucked into skirts…so the tie was never actually seen, just used to control the blousing above.
Version four is the first I’ve felt good enough about to offer for sale. I planned to make lots more just like it, and in different sizes too. But sheesh, this was just too much work. I’d have to charge a fortune. So it’s back to the drawing board, this time for some sewing shortcuts. In the meantime, you can buy this one-of-a-kind blouse for a ridiculously low price right here.
Gotta admit, I’m starting to itch for an authentic armistice blouse too. Maybe once I get the “modern” version perfected, I’ll have to give an historically accurate one a go too.
Sickle
January 22nd, 2013
Last spring, the dearest wish of my heart was to own a scythe. You know, one of those old agricultural tools with a long curved handle, and metal blade. They were used to harvest grain before modern farm machinery took over.

Man with a Scythe, Eastman Johnson, 1868
Turns out though, scythes were primarily the domain of men. Something about upper body strength and reach, not to mention the possibility of cutting off a leg. Women stuck to the smaller, crescent-shaped sickle. At least in genre paintings (reference my ongoing obsession with Gleaner subjects).
So today, I finally purchased my first sickle. It’s got a wooden handle and a curved metal blade, lined with little teeth on the inside of the crescent.
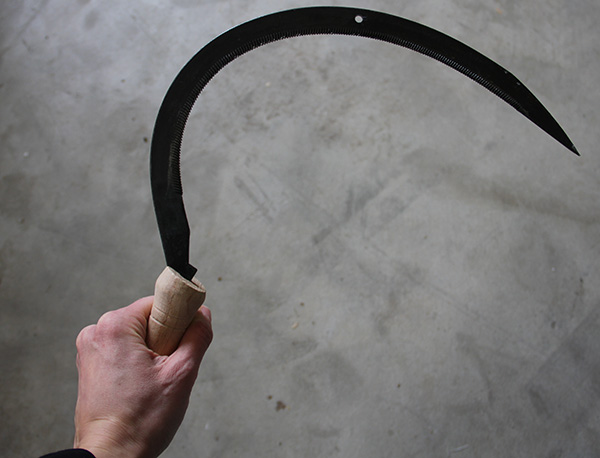
Coincidentally, our yard is badly in need of a mow. So I had to go outside and give it a try. It’s surprisingly efficient. Especially with long grasses. You have to hold onto a clump with one hand, while you hack and saw at it simultaneously with the sickle, so lots of crouching is involved. But it gets the job done. I estimate it will take the better part of a day to mow our yard using the sickle. By then, I should be an expert.
Oh, and I’m already learning. It’s a good idea to wear heavy gloves while wielding something this sharp, that close to your knuckles…
HSF #1: Bi/Tri/Quadri/Quin/Sex/Septi/Octo/Nona/Centennia
January 13th, 2013
I wasn’t sure I was even going to participate in the first official Historical Sew Fortnightly challenge. To be honest, I don’t really have an affinity for any years ending in 13. Most of my historical fashion obsessions seem to spring from the historic houses at which I have worked. Turn of the century, yes — I’ve done Edwardian and Federal/Regency/Empire — but I’ve never made it into the teens.
It was a 1913 cutting diagram from the introductory materials in Janet Arnold’s Patterns of Fashion II that finally sold me. A description on Dressmaking Research caught my eye, and seemed to jive with the Arnold diagram.
“Skirts cut in two pieces have proved so well liked that they are one of the most often remarked models in the suit or separate skirt. No. 6658 is the newest design with just the desired width. The possibility of sloping the front edges away at the foot is appreciated, for some women like the added freedom it allows in walking. In the medium size the lower edge measures about one and five-eighth yards. There is a slightly high or a regulation waistline fitted with scant gathers or darts. The skirt may be closed at back or front and finished in round or shorter length. Serge, cheviot, wool rep, whip-cord, broadcloth, homespun, suitings, linen, pique and agaric are the materials suggested.
“A woman of medium size requires two and five-eighth yards of material thirty-six or more inches wide, Thirty-six inches is the narrowest width that may be successfully used because the model is cut in only two pieces.”
Designer, March 1913
So with brave heart and steady hand, I chopped into a length of green-and-white textured houndstooth of indeterminate fibre content (thrift store find) and started draping. The result is a little iffy, but not terrible for a first draft. I really like the two-piece construction: a pair of identical sections, each comprising half of the front and back, with a dart over the side hip and darts or gathers fitting the waist. It lends itself beautifully to the pegged tops, draping, and cross-overs that were popular in the teens. It’s also just fine as a plain walking skirt.
Unfortunately, a couple of late night cutting mistakes combined with fabric that refused to dart properly (wool will work MUCH better) add up to a skirt that doesn’t quite scream 1913. But it passes. With my second armistice blouse, plus 1930s hat and gloves thrown in, it’s surprisingly credible. Especially since I haven’t a stitch of teens underwear to help with the shaping.

Notice the wrinkles and flabbiness around the hem? They wouldn’t iron out, no matter how long and hard I pressed, nor how many vile chemical smells emanated from the heated fabric.
Here you can see my dirty little secret — the majority of the skirt’s fullness ended up in the back. These gathers are a little more than scant — shades of Edwardianism, gasp! But I think I can fix it next time by moving the side darts and using more conducive fabric. Can you tell I’m eager to explore this pattern more? And maybe even create a modern version to accompany my updated armistice blouses…

The only part of this skirt that really makes me happy is the waistband.
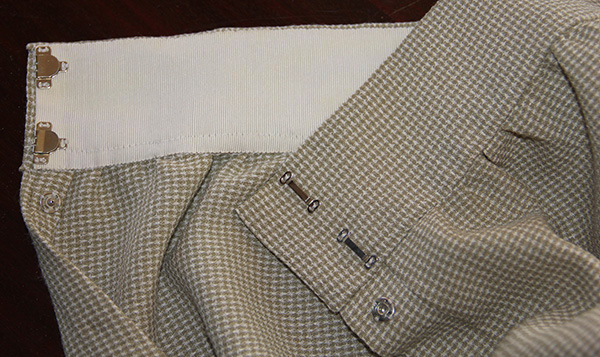
It provided one of those costuming “ah ha” moments when you suddenly realize that you’ve created something that looks just like a technique seen on extant garments but never properly understood. Lots of late-19th and early-20th century skirts have self-fabric waistbands faced with grosgrain ribbon. It’s a neat trick, creating a strong band without too much bulk. Common sense told me to sew the skirt to the ribbon first. Then I machine-stitched the fabric waistband to cover the join, turned the top and side edges under, and blind-stitched it to the ribbon. The result mimics period waistbands perfectly, right down to the line of machine stitching along the bottom of the ribbon!
Just the facts, Ma’am: 1913 Two-Piece Skirt
The Challenge: #1: Bi/Tri/Quadri/Quin/Sex/Septi/Octo/Nona/Centennia
Fabric: Textured Green & White Houndstooth, unknown fibre content (thrift store find)
Pattern: Custom draped based on cutting diagram in Patterns of Fashion II
Year: 1913
Notions:5 metal snaps, two waistband hooks and metal eyes.
How historically accurate is it?Hardly. Let’s call it more historically inspired. The silhouette is close-ish in a generic sense, but definitely no cigar. I need to do a LOT more research (and make some underwear) before I can feel confident calling anything I make from the teens historically accurate. I did use all period techniques — no zig-zag stitch, plenty of hand-finishing, etc. The material itself is some modern abomination, but the metal closings are pretty much accurate.
Hours to complete: Less than 10. Which is probably a speed record for me! What a difference a sewing machine makes.
First worn: This afternoon, to take photos. I briefly considered taking it out for a neighborhood stroll, but a rare California cold snap kept me huddled indoors. Thanks to a teensy cutting mistake (where I ignored seam allowances at the center front), I probably won’t be wearing this very often until the approach of bikini season inspires me to lose a little weight.
Total cost: $2.5o for thrift store fabric. The fasteners were inherited.
A Seaman’s Watch Cap
January 10th, 2013
Charity knitting was a popular pastime among ladies of the newly leisured industrial class during the mid-19th century. Before the advent of government sponsored welfare programs, women of means helped bridge the gap for poorer families by providing baskets of food and practical clothing (like warm socks or serviceable shawls). They were often motivated by religious duty as much as their own generosity. In addition to sponsoring indigent locals, ladies might also target other deserving groups, such as missionaries or sailors, with the fruit of their needles.
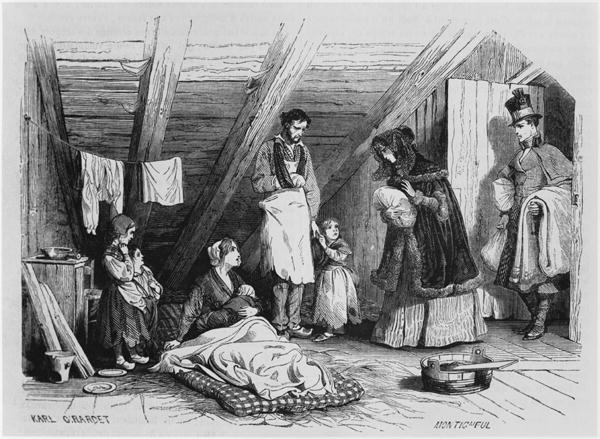
Visiting the Poor, from La Magasin Pittoresque, 1844
Fast forward to the late-20th century, and you find that many women are still eager to knit for those in need: hats for preemies, sweaters for penguins, and all sorts of other worthy causes. My own grandmother’s pet knitting charity was the Seamen’s Center, Port of Wilmington. It’s a service of the Episcopal diocese of Delaware, offering accommodations, clothing, and much more to merchant seamen while they are in port. Along with her guild, Gram knitted countless watch caps to warm chilly heads on the open seas.
While cleaning out my studio this week, I came across her last hat, maroon with a double white stripe above the band. It was nearly finished — I just had to sew the seam up the side. I wrote a little note explaining who’d made the hat, and her long-time dedication to their cause, and mailed it to the Seamen’s Center. Then I remembered that she’d given me a copy of the watch cap pattern years ago.
I whipped up this variegated version in a matter of hours.

Only I had to promise my husband that he could keep the hat before he’d agree to model it, so this watch cap isn’t going to sea. But the next one will. And the one after that.
Would you like to knit a watch cap too? The pattern is linked below. I didn’t write it, but I figure it’s okay to share on the honor system — which means, if you want to use it, you have to knit at least one watch cap to donated to the Seamen’s Center. Their address is listed on the document. There’s no deadline, no rules about color or fiber content.
Seamen’s Center Watch Cap Pattern
If you do make a cap, I’d love to see a picture. Leave me a link to your blog or photo page in the comment area of this post.
« Newer Posts — Older Posts »