Fits & Puckers
February 2nd, 2011
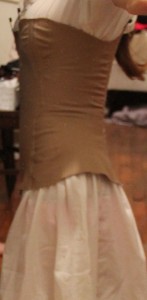
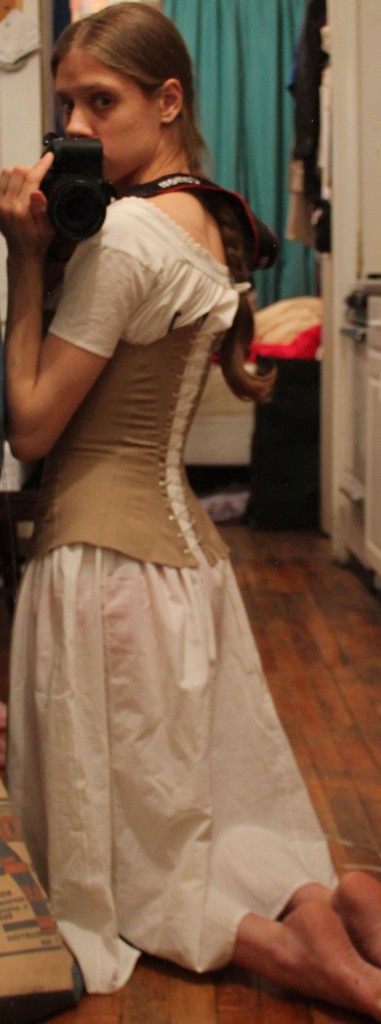
I continue to make slow but steady progress on my stays. Last weekend I finished hemming in the stay tape (where it was indicated on the 1855/1857 pattern) and sewing a self-fabric busk casing (because I was too lazy to go uptown for 3/4″ webbing). I filled the channels with my zip ties, pinned the busk in place, and laced it up
The fit is very promising, but there are still a few issues. Mostly the problems are with my materials. I’m using plain twill fabric that came with a corset kit I never made, and it’s far too flimsy for single layer stays. I think that’s (partly) why it’s puckering around the gores. Also, the 1/2″ steel bone I bought to fill in until I can get someone to make me a real busk is way too flexible. It looked like I was wearing a spoon busk! Corsetmaking.com sells an extra thick boning that may do the trick. I need to order laces anyway, so I’ll give it a try.
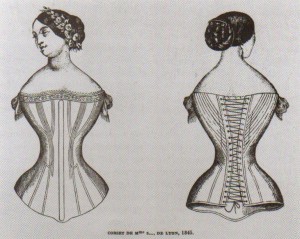
I’m also going to put in some more full-length bones in hope that they will eliminate some of the worst puckers. As written, the pattern only has full-length support at the center front (busk) and flanking the lacing holes. I am hemming in tapes for side bones as I write. And if they don’t do the trick, I may also put full-length bones next to the existing half-bone between the bust gores, as shown in this 1845 French ad:
Going back to the fabric again, I think I will swallow my reluctance to pay $30 a yard for cotton fabric and purchase some real coutil for my next single layer stays. I’m also anxious to try a double layer version, as described in the Workwoman’s Guide. An added advantage to two layers — you can strengthen areas that don’t quite need boning with cords!
Regardless, I am actually very happy with the pattern and look forward to having a pair of working stays so that I can start fitting some actual dresses. I can’t believe I was worried about having too much spring though…these will lace nearly closed if I tug at them, taking my waist down to 24 inches instead of the planned 25. Eek!
P.S. There are now a couple of tiny blood stains on the front of the stays, where I tore my fingers on the pin holding in the busk. Just in case you wanted to know absolutely everything.
Crochet Edging
January 17th, 2011
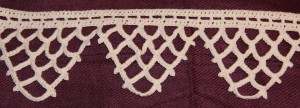
Here’s another edging, recommended for petticoats, from Peterson’s, 1855.

The pattern was remarkably well written and easy to follow, especially with the clear and accurate illustration. I still haven’t figured out how to gauge sizes on 19th-century cotton, but I’ve found some patterns for very fine tatted lace that call for no. 20 or 30 boar’s-head cotton, and directions for a coverlet calling for no. 10. So I am going to presume that, like today, the higher size numbers indicate finer thread. This pattern bears that out as well, asking no. 10 for a petticoat trim, but 16 or 20 for a child’s drawers.
I used what I had on hand to make up a sample — modern no. 16 cotton and a 1.3 mm hook. I don’t think I’d want to trim a petticoat with anything thicker than a modern no. 16; this is a pretty edging, but a bit on the stiff side already. It does seem strong, which was a frequently stated prerequisite for any undergarment trimming (they boiled their laundry, then it was wrung out, and finally put it through a mangle).
Best of all, even though it is worked over the full required length for the first four rows, it does work up relatively quickly. I wouldn’t mind making 100 or so inches of this to trim a petticoat. Someday.
Oh Drat
January 16th, 2011
Having received the steel boning and twill tape that I ordered from Lacis, I set about putting the rest of my new stays together. But all is not well. Let me not alarm you — nothing is lost, it will all come right in the end; but for the moment, I am exceedingly frustrated.
1stly, the half-inch steel boning that I ordered seems far too flexible to make a good busk. Luckily I ordered 4 steels, so I can double it should my suspicions prove correct. I really think I will have to commission a metal worker to make a busk for my next pair of stays.
2ndly, as I prepared to hem in the bone casing for the wee little bones at the top front, I realized that my stomach gores are too short nearly by half. This would explain their ill-fit as well I guess. But it also means I need to tear out the stitching, extend the slits, and cut new gores to go into the spaces. Oh me, oh my.
3rdly, I am having trouble telling exactly where the boning is meant to go. I know there are two long bones flanking the rows “french holes” up each side of the back. There is also a pair of short bones going diagonally across the top half of the back. There seem to be another set of the same in the middle of the front. I think there are also meant to be bones between each set of bust gores, extending down to just shy of the stomach gore. But I find no evidence of side bones under the arms on the illustration or in the directions. The Workwoman’s Guide, written nearly 15-20 years earlier, but describing nearly the same form, does mention bones at the side…
And lastly, I realize that I will need to cut and sew a tiny buttonhole at the bottom of each bone place in order to insert or remove the bones once the stays have been bound. Did I mention that I hate buttonholes?
On a more cheerful note, I discovered the exact same pattern and directions from which I’ve been working (found by your faithful correspondent in Godey’s, 1857) in a copy of Peterson’s, 1855! So they are indeed earlier than the cage crinoline. And Godey’s should be ashamed for stealing so unabashedly.
Guipure Trimming
January 11th, 2011
Some women indulge themselves with expensive perfumes, dark chocolate, or spa visits. I subscribe to Accessible Archives. For a modest yearly fee, I can search every issue of Godey’s Lady’s Book ever published, not to mention lots of other great historical sources. The only down side is that since I find whatever I want immediately, I rarely bother to browse. And browsing is the best way to come across what you aren’t looking for.
Peterson’s Magazine, a Godey’s copycat, is searchable only through a very expensive academic database. So I read back issues, bound by the year, thanks to Google Books. I was browsing Peterson’s 1855 for chemise patterns when this showed up:
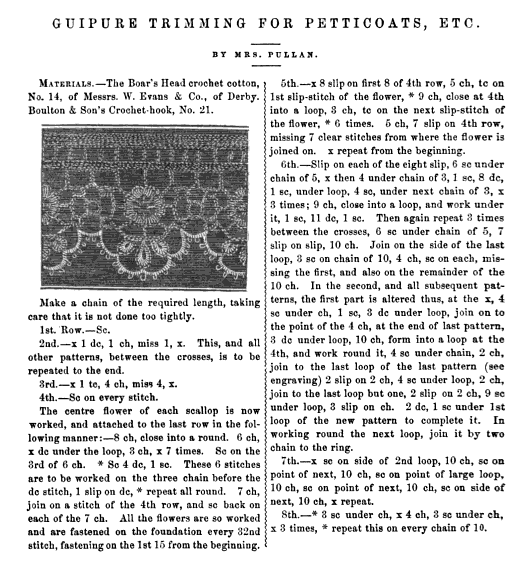
Given my recent obsession with petticoat trimming, I earmarked it for a trial run. And last week, I pulled out my crochet hook and a skein of cotton thread and whipped up 4 repeats of the pattern. Since the way thread and needle sizes are designated have changed since the 1850s, it’s always a bit of a guessing game to see which you should use. I had number 16 cotton on hand, and a size 10 (1.3 mm) crochet hook. The hook was a little small for the thread, but the next one up in my kit was far too big.
I really like the way this pattern looks. Though I would prefer a finer thread. Probably a great deal finer. Like most crochet edgings, it starts with a chain as long as you will require. There are only 7 rows, but at least two are quite involved. I think it would be slow going to trim a full petticoat, though not nearly so slow as Broderie Anglaise. And the effect would likely be stunning.
I had to fiddle with the pattern a little to make it work; thank heavens for the picture, which helped with intuitive leaps when the written directions became unclear. Some of the changes I made might not have been necessary though if I’d been using finer thread…and the end result would likely have been neater.
Oh, and if you are afflicted with curiosity, like me and the cat, real guipure is a heavy needlepoint lace in which the patterns are connected by thread ties or mesh. True lace, which was phenomenally expensive in the mid-19th century, was often imitated by crochet. One of the most noted examples of this is the legendary Irish crochet: “faux” laces created with great dexterity and sold by women to support their families during the Famine. Incidentally, by the end of the 19th century, exquisite Irish crochet was valued on its own merits, rather than its ability to mimic more expensive laces.
Daring Display
January 4th, 2011
Callooh! Callay! I finished my drawers tonight, stitching down the inside of the waistband, sewing on three buttons, and making (shudder) three buttonholes.

Shell buttons, made on an antique, though I doubt mid-19th century, press. They are arranged in a slanted fashion to accommodate my curves throughout this very wide (1.5 nails or a little less than 3.5 inches!!) waistband.

Miserable, wretched buttonholes (I abhor buttonholes). Worked according to directions from the Workwoman’s Guide, which suggested that sewing around the edge of the buttonhole adds a nice effect. I am not entirely sure I agree — looks a bit sloppy to me.
In celebration, I am doing something very daring: presenting pictures of myself wearing split leg drawers, and nothing else. Forgive me if I shock the more timid among you with my excessive boldness. Please pardon my messy house and enormous feet.


And a close up of my Broderie Anglaise frill.
« Newer Posts — Older Posts »

